Command # du -hsx * | sort -rh | head 15
Description:
du -hsx * – check file sizes in directory
Sort -rh – sort files by highest size
head 15 – shows 15 line output or files with size
Thats it…!!

Command # du -hsx * | sort -rh | head 15
Description:
du -hsx * – check file sizes in directory
Sort -rh – sort files by highest size
head 15 – shows 15 line output or files with size
Thats it…!!
Remove Tomcat application WEB URL without context or application name.
Like,
URL : linuxsysad.abc.com/tomcatapp
tomcatapp name is example of our tomcat application. (Don’t take seriously ).
What we are going to do ?
We changed web URL linuxsysad.abc.com/tomcatapp to linuxsysad.abc.com (Without tomcatapp application name).
Tested in Centos7
nginx
tomcat 9
No changes required in existing Nginx tomcat configuration file.
Changes required in server.xml in tomcat server directory.
Tomcat server configuration file path: /website_dir/tomcat/conf/server.xml
Open server.xml file in your feveroit editor and
find below lines, (Moslty line number 152)
<Host name=”localhost” appBase=”webapps”
unpackWARs=”true” autoDeploy=”true”>
replaced with below line. Kindly make sure change path as per your configuration or path.
put your hostname and tomcat webapp path.
<Host name=”linuxsysad.abc.com” debug=”1″>
<Context path=””
docBase=”/web/tomcat/webapps/tomcatapp”/>

Save & exit file.
Now restart tomcat service.
All done..!
Issues occurred in Cantos 7, while terminating process.
Error: killall: command not found
Solution:
Install package.
For CentOS 7 :
# sudo yum install psmisc
For Ubuntu :
# sudo apt install psmisc
Done..!
Tested in CentOS 7
How to approve mailman pending moderated message or email to a moderated mailman list from the command line.
Go to mailman installed directory.
In our case it is /usr/lib/mailman
Go to Mailman bin directory located in installed mailman directory.
# cd /usr/lib/mailman/bin
In bin directory you can find list of command line scripts for mailman.
Now carefully run below commands.
We are going to use list_requests & withlist scripts to approve pending moderation emails.
All scripts run with ./ command. like ./list_requests.
To check pending moderated emails or messages from mailing list.
sample command : ./list_requests –verbose –list=LISTNAME
Were LISTNAME is the name of mailing list or mailng group where request are pending for moderation.
In our case mailing list name is AUDIT.
# ./list_requests –verbose –list=audit
It will shows pending request output as below. We have 2 pending post in audit mailing list.
Pending posts:
From: user01@gmail.com on Fri Aug 9 15:40:27 2021
Subject: Re: THIS IS LINXSYSAD BLOG
Cause: Post by non-member to a members-only list
237 <—– We need this id to release this mail from pending moderation.
Pending posts:
From: user2@gmail.com on Fri Aug 9 15:40:27 2021
Subject: Re: THIS IS LINUXSYSAD BLOG
Cause: Post by non-member to a members-only list
312 <—– We need this id to release this mail from pending moderation.
Next, we will run ./withlist script, it will open shell prompt for inputs.
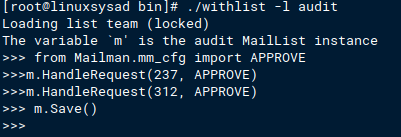
# ./withlist -l audit
It will show below output

Next, type below line. output will be blank.
# from Mailman.mm_cfg import APPROVE
Next, type below command with pending mail unique ID
# m.HandleRequest(237, APPROVE)
237 is the mail unique ID, we get this ID from list_request command.
# m.HandleRequest(312, APPROVE)
312 is the mail unique ID, we get this ID from list_request command.
Next, save the state of the list with below command.
# m.Save()
Once save command is done pending mails will be sent. Press Control+D to exit terminal.
All above commands look like below image.
That’s It.. Pending mails should be sent after this all commands.
Django python issue.
While installing mysqlclient in python environment get error.
ERROR:
no matching distribution found for mysqlclient.
ERROR: Could not find a version that satisfies the requirement mysqlclient==1.3.12
Solution:
Install base packages:
yum install python3-devel mysql-devel
Now try to install mysqlclient in python environment.
(env) [root@linuxsysad myproject]# pip install mysqlclient==1.3.12
SEARCH AND COPY FILES IN LINUX. | FIND | CP
Search for zip files inside sub-directories and copy all zip files.
# Directory where all .zip files are located is zipfiles-dir.
Command :
cd zipfiles-dir
—————————————————————————————–
2. RUN BELOW COMMAND INSIDE DIRECTORY.
find . -iname *Slides.zip -exec cp {} /root/test/ \;
Describe above command.
find : Command to find files and directories in Linux system.
. : We use . as location means current directory.
–name *Slides.zip : Search for file name matching with extension *Slides.zip, It means All .zip files which name ends with Slides.zip.
–exec cp : excecute to cp command to to copy files form source directory to destination directory.
{} : Files found by FIND command will be automatically replace by filename.
/root/test/ : Destination diectory where all searched files are copied.
\ : Indicates that executed command is completed.
—————————————————————————————-
LVM – Logical Volume Manager
=======================
Tested in CentOS 7.
Physical Hard Drive ==> Physical Volume ==> Volume Group ==> Logical Volume ==> File-system ==> Mount point
LVM is disk management solution, to manage disk space more effectively.
LVM allow ADD , RESIZE , REMOVE volume size online in the existing volume without taking any downtime.
Basic idea about how to create LVM in linux.
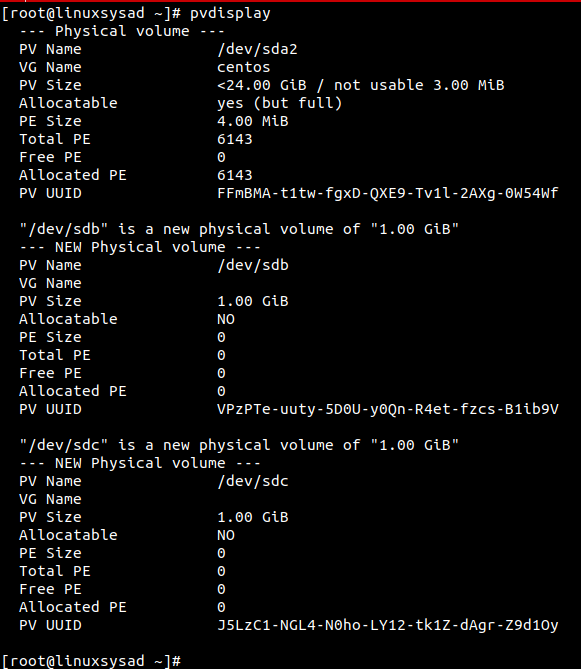
Create Physical Volume.
# pvcreate /dev/sdb /dev/sdc

To view the physical volume (PV) information.
# pvscan

PVdisplay command to view physical volume (PV) size, physical extend size, free space etc.
only pvdisplay command shows all pysical volumes in system. if want to view saperate physical volume run below command.
# pvdisplay /dev/sdb

Create Volume group (VG) over physical volume (PV).
# vgcreate vgdata /dev/sdb /dev/sdc

Display newly created volumegroup vgdata.
Parameters used : -v for verbose
# vgdisplay -v vgdata
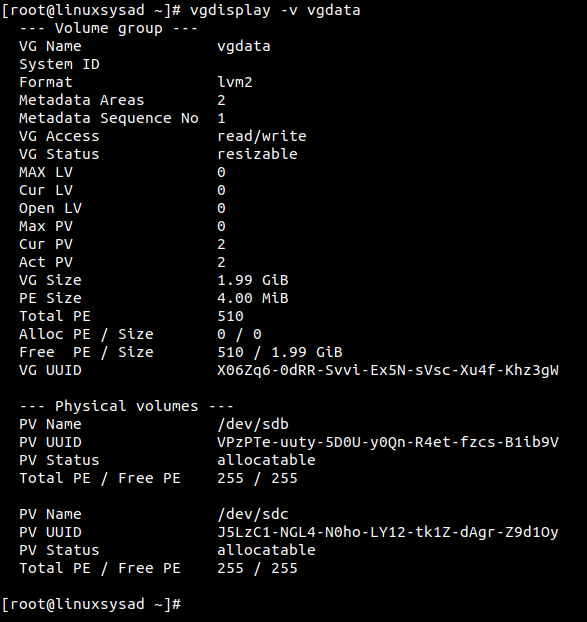
Please note, Physical extent PE default size is 4 MB
What is Physical Extents PE ?
Physical volume is divided chunks of data, known as physical extents, these extents have the same size as the logical extents for the volume group.
Create Logical Volume (LV) over Volume Group (VG).
Parameters used : -L for specify volume size in G(GB), M(MB)
-n for specify Logical volume name.
# lvcreate -L 1GB -n lvdata vgdata

Display Logical volume information. (in /dev vgdata direcotry created after lvcreate command. we need to spacify path to check LV info )
# lvdisplay -v /dev/vgdata/lvdata

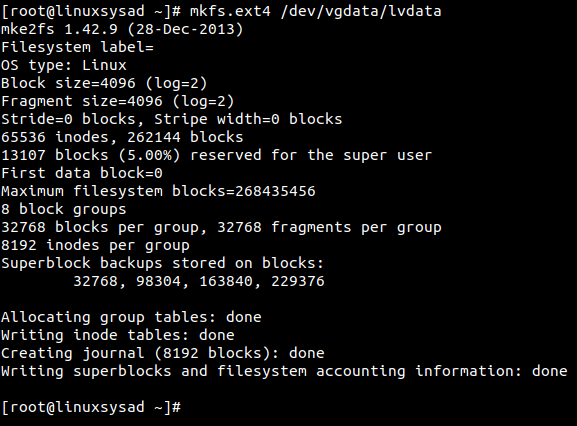
Lets create filesystem or format our new logical volume(LV) for use.
Parameters Used: mkfs.ext4 for format LV in linux ext4 filesystem.
# mkfs.ext4 /dev/vgdata/lvdata
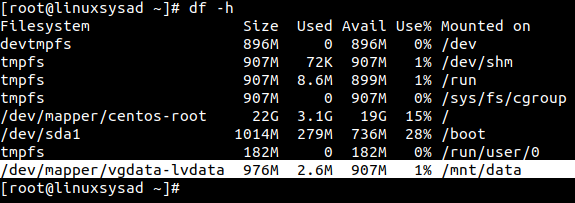
Lets mount our new LV on /mnt/data directory.
# mkdir /mnt/data
# mount /dev/vgdata/lvdata /mnt/data

Check mounted Logical volume using df -h command.
# df -h
🙂👍
ERROR:
File “/usr/lib/python3.6/importlib/init.py”, line 126, in import_module
return _bootstrap._gcd_import(name[level:], package, level)
File “/home/kirti/spoken-project/spokenV3/lib/python3.6/site-packages/django/db/backends/mysql/base.py”, line 30, in
‘Did you install mysqlclient or MySQL-python?’ % e
django.core.exceptions.ImproperlyConfigured: Error loading MySQLdb module: libmysqlclient.so.21: cannot open shared object file: No such file or directory.
Did you install mysqlclient or MySQL-python?
Solution:
apt-get install python-dev libmysqlclient-dev
ERROR:
error: command ‘gcc’ failed with exit status 1
—————————————-
ERROR: Command errored out with exit status 1: /website/st_forum3/py3_forums/bin/python3 -u -c ‘import sys, setuptools, tokenize; sys.argv[0] = ‘”‘”‘/tmp/pip-install-irkz7or4/mysqlclient/setup.py'”‘”‘; __file__='”‘”‘/tmp/pip-install-irkz7or4/mysqlclient/setup.py'”‘”‘;f=getattr(tokenize, ‘”‘”‘open'”‘”‘, open)(__file__);code=f.read().replace(‘”‘”‘\r\n'”‘”‘, ‘”‘”‘\n'”‘”‘);f.close();exec(compile(code, __file__, ‘”‘”‘exec'”‘”‘))’ install –record /tmp/pip-record-95hukcvi/install-record.txt –single-version-externally-managed –compile –install-headers /website/st_forum3/py3_forums/include/site/python3.6/mysqlclient Check the logs for full command output.
Solution:
Tested In CentOS 7 : Python 3.6 Environment
sudo yum install python36 python36-devel python36-libs python36-tools gcc-c++
sudo yum install gcc-c++
In CentOS/Fedora : Found issue with yum package.
There was a problem importing one of the Python modules
required to run yum. The error leading to this problem was:
pycurl: libcurl link-time ssl backend (nss) is different from compile-time ssl backend (openssl)
Please install a package which provides this module, or
verify that the module is installed correctly.
It’s possible that the above module doesn’t match the
current version of Python, which is:
2.7.5 (default, Nov 6 2016, 00:28:07)
[GCC 4.8.5 20150623 (Red Hat 4.8.5-11)]
If you cannot solve this problem yourself, please go to
the yum faq at:
http://yum.baseurl.org/wiki/Faq
Solution: Execute below commands in terminal.
#recompile pycurl
#upgrade pip
# Uninstall current pycurl
#set PYCURL_SSL_LIBRARY
# recompile and install pycurl
# Run YUM package manager
Hope this post will helps..! Enjoy 🙂


