Issues occurred in Cantos 7, while terminating process.
Error: killall: command not found
Solution:
Install package.
For CentOS 7 :
# sudo yum install psmisc
For Ubuntu :
# sudo apt install psmisc
Done..!

Issues occurred in Cantos 7, while terminating process.
Error: killall: command not found
Solution:
Install package.
For CentOS 7 :
# sudo yum install psmisc
For Ubuntu :
# sudo apt install psmisc
Done..!
WARNING: CONNECT TO MILTER SERVICE INET:127.0.0.1:8891: CONNECTION REFUSED
Tested in CentOS 7
Above error logged in /var/log/maillog
The above issue occurred as a result of the following factors.
Check opendkims service status.
# systemctl status opendkim.service
If service is inactive or stoppedrun below command to start.
# systemctl start opendkim.service
Change in /etc/opendkim.conf. (Under Line: Create a socket through which your MTA can communicate)
Socket inet:8891@localhost
SEARCH AND COPY FILES IN LINUX. | FIND | CP
Search for zip files inside sub-directories and copy all zip files.
# Directory where all .zip files are located is zipfiles-dir.
Command :
cd zipfiles-dir
—————————————————————————————–
2. RUN BELOW COMMAND INSIDE DIRECTORY.
find . -iname *Slides.zip -exec cp {} /root/test/ \;
Describe above command.
find : Command to find files and directories in Linux system.
. : We use . as location means current directory.
–name *Slides.zip : Search for file name matching with extension *Slides.zip, It means All .zip files which name ends with Slides.zip.
–exec cp : excecute to cp command to to copy files form source directory to destination directory.
{} : Files found by FIND command will be automatically replace by filename.
/root/test/ : Destination diectory where all searched files are copied.
\ : Indicates that executed command is completed.
—————————————————————————————-
LVM – Logical Volume Manager
=======================
Tested in CentOS 7.
Physical Hard Drive ==> Physical Volume ==> Volume Group ==> Logical Volume ==> File-system ==> Mount point
LVM is disk management solution, to manage disk space more effectively.
LVM allow ADD , RESIZE , REMOVE volume size online in the existing volume without taking any downtime.
Basic idea about how to create LVM in linux.
Create Physical Volume.
# pvcreate /dev/sdb /dev/sdc

To view the physical volume (PV) information.
# pvscan

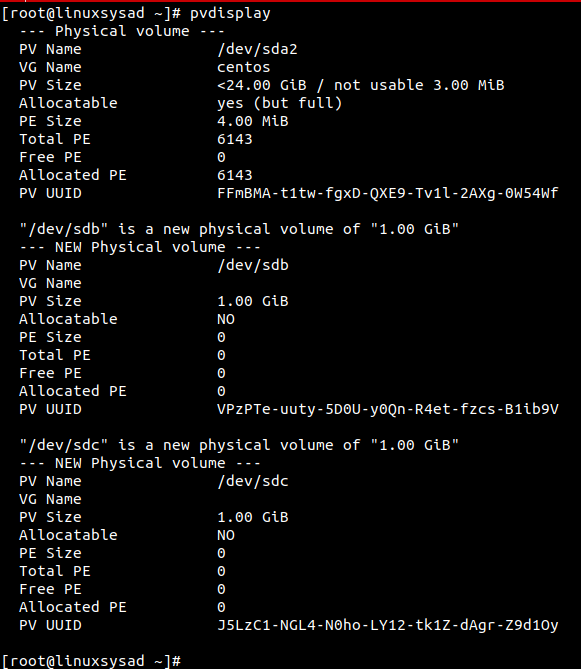
PVdisplay command to view physical volume (PV) size, physical extend size, free space etc.
only pvdisplay command shows all pysical volumes in system. if want to view saperate physical volume run below command.
# pvdisplay /dev/sdb

Create Volume group (VG) over physical volume (PV).
# vgcreate vgdata /dev/sdb /dev/sdc

Display newly created volumegroup vgdata.
Parameters used : -v for verbose
# vgdisplay -v vgdata
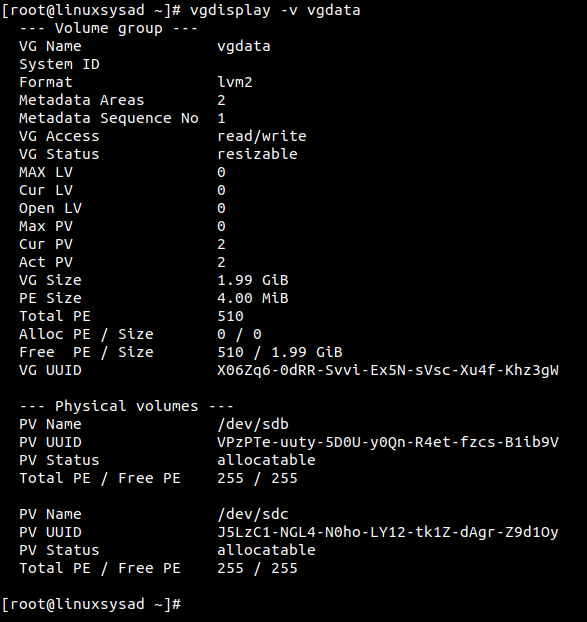
Please note, Physical extent PE default size is 4 MB
What is Physical Extents PE ?
Physical volume is divided chunks of data, known as physical extents, these extents have the same size as the logical extents for the volume group.
Create Logical Volume (LV) over Volume Group (VG).
Parameters used : -L for specify volume size in G(GB), M(MB)
-n for specify Logical volume name.
# lvcreate -L 1GB -n lvdata vgdata

Display Logical volume information. (in /dev vgdata direcotry created after lvcreate command. we need to spacify path to check LV info )
# lvdisplay -v /dev/vgdata/lvdata

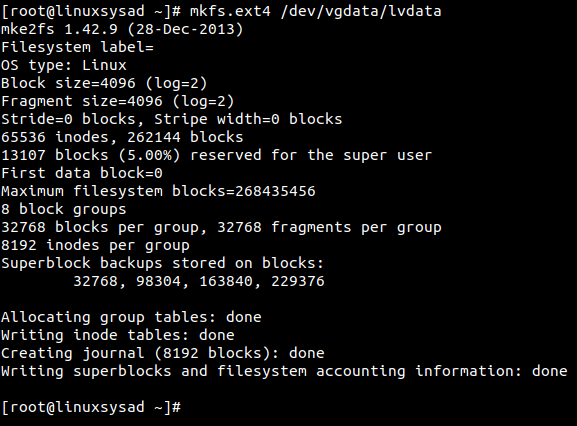
Lets create filesystem or format our new logical volume(LV) for use.
Parameters Used: mkfs.ext4 for format LV in linux ext4 filesystem.
# mkfs.ext4 /dev/vgdata/lvdata
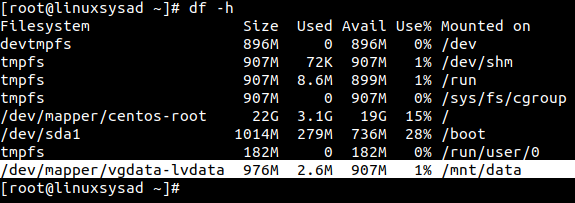
Lets mount our new LV on /mnt/data directory.
# mkdir /mnt/data
# mount /dev/vgdata/lvdata /mnt/data

Check mounted Logical volume using df -h command.
# df -h
🙂👍
In CentOS/Fedora : Found issue with yum package.
There was a problem importing one of the Python modules
required to run yum. The error leading to this problem was:
pycurl: libcurl link-time ssl backend (nss) is different from compile-time ssl backend (openssl)
Please install a package which provides this module, or
verify that the module is installed correctly.
It’s possible that the above module doesn’t match the
current version of Python, which is:
2.7.5 (default, Nov 6 2016, 00:28:07)
[GCC 4.8.5 20150623 (Red Hat 4.8.5-11)]
If you cannot solve this problem yourself, please go to
the yum faq at:
http://yum.baseurl.org/wiki/Faq
Solution: Execute below commands in terminal.
#recompile pycurl
#upgrade pip
# Uninstall current pycurl
#set PYCURL_SSL_LIBRARY
# recompile and install pycurl
# Run YUM package manager
Hope this post will helps..! Enjoy 🙂
Memcached is a configurable memory object caching daemon that stores objects in memory to reduce database load in dynamic web applications.
It’s built on top of libevent to grow to any size, and it’s specially designed to minimise swapping and utilise non-blocking I/O wherever possible.
Memcached is high performance in memory cache system that is useful to speed up websites which used heavy database. Memcached support many programming languages like PHP,Ruby,Python,Perl.
[root@linuxsysad ~]# yum clean all
[root@linuxsysad ~]# yum update
[root@linuxsysad ~]# yum -y install memcached
[root@linuxsysad ~]# systemctl start memcached
[root@linuxsysad ~]# systemctl enable memcached
The default configuration file can be found at:
/etc/sysconfig/memcached
When started, Memcached will start on port 11211 by default as per the default configuration file:
PORT=”11211″
USER=”memcached”
MAXCONN=”1024″
CACHESIZE=”64″
OPTIONS=””
CACHESIZE is default set in MB. For example we set CACHESIZE=”64″ means it is 64 MB.
Run Below Command in the current directory to find 0 kb files.
We add ‘f’ option for files.
[root@linuxsysad ~]# find ./ -type f -empty
__ __ __ __ __ __ __ __ __ __ __ __ __ __ __ __ __ __ __ __ __ __ __ __ __ __ __ __ __ __ __ __
Run Below Command in the current directory to find 0 kb Directories.
We add ‘d’ option for Directory.
[root@linuxsysad ~]# find ./ -type d -empty
Find file by name or extension.
We use . option to find all mp4 files in current directory.
[root@linuxsysad ~]# find . -name “*.mp4”
__ __ __ __ __ __ __ __ __ __ __ __ __ __ __ __ __ __ __ __ __ __ __ __ __ __ __ __ __ __ __ __
We use /home/linuxsysad/ directory path to find all mp4 files in /home/linuxsysad.
[root@linuxsysad ~]# find /home/linuxsysad -name “*.mp4”
[root@linuxsysad ~]# ssh-keygen -t rsa
Generating public/private rsa key pair.
Enter file in which to save the key (/root/.ssh/id_rsa):
Enter passphrase (empty for no passphrase): PRESS ENTER KEY FOR BLANK PASSWORD
Enter same passphrase again: PRESS ENTER KEY FOR BLANK PASSWORD
Your identification has been saved in /root/.ssh/id_rsa.
Your public key has been saved in /root/.ssh/id_rsa.pub.
The key fingerprint is:
SHA256:l0G3/GrujoduLPWr7a/k7vjNcwhuF2ONI/oalNMtYVk root@linuxsysad
The key’s randomart image is:
+—[RSA 2048]—-+
| . . E |
| . o + |
| . * |
| * + |
| S * o oo |
| o..oo* .|
| o.=++ = |
| . =X=o+ .|
| +*&#=+o |
+—-[SHA256]—–+ Continue reading SSH login without password


